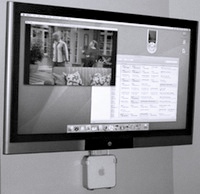
If you have an old Mac lying around collecting dust, repurposing it to be a media center should be a good idea. That is, turning it to be the center screen of your home theater. A mac mini is better for this since you can hook it up to your big-screen TV. But an iMac can also be a nice place to enjoy HD videos since even the 21.5″ iMac is capable of 1080p (Full HD) in perfect details.
 A good friend of ours was kind enough to gave him his old (2007) iMac as he was purging his apartment as he wanted to rent it out and took a job in New York. It was a 24″ Core 2 Duo machine – feels a bit slower than our MacBook Airs but the big screen pretty much lends itself as a movie machine. Here’s how I set it up and you can follow what we did for your own Mac media center.
Overview
- Setup a shared iTunes library
- Create a dedicated “media center” user account.
- Install xbmc
- Configure iTunes and xbmc on the media center user
- (Optional step) Activate Parental Controls and Simplified Finder on the media center account
- Test the media center user account
- Setup auto login to the media center account
Sharing the iTunes Library
You’ll need the iTunes library to be in a shared location so that all users of the machine can access it. Since this is a shared machine, it’ll might as well be a shared location to save disk space. Follow these steps to move your iTunes library so that it can be accessed by all users of the machine. Note that only one user should access it at any given moment or otherwise the library may become corrupted – iTunes library files are not designed for concurrent modifications.
- Shut down iTunes
- Locate your iTunes library folder inside your home folder, something like
/Users/yourname/Music/iTunes. - Move the
iTunesfolder into/Users/Shared/Music– this will place it to a shared location that everyone can see. - Ctrl-Click on the iTunes folder and select Get Info. Then then add permissions for Everyone to read/write the folder.
- Start iTunes while holding the Option (⌥) button. You will be prompted to locate the iTunes folder location. Point it to the new library location in
/Users/Shared/Music/iTunes. - Test out iTunes to make sure that it is working properly.
Creating a dedicated user
You’ll need a designated user account that will run the media center application as well as any other applications that you house guests may need to use. Set this up as a regular user without administrative privileges so there will be less chance for other people to mess up your mac.
You’ll need to have a user just for running the media center applications as well as any applications that your house guests may need to use. Set this as a regular user without administrative privileges, so that there will be less chance for other people to mess up your computer.
- Open System Preferences and go to Users and Groups
- Click the “+” button on the lower left edge to create a new user.
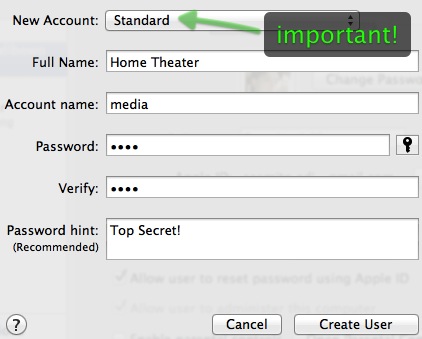
- Set the Account Type as Standard, Full Name as “Home Theater” and Account Name as “media”. Give it a password that you can remember. Then click on Create User to confirm it.
- Give the user account a nice avatar icon which shows that it doesn’t correspond to a human being. I chose the phonograph record icon for my home theater account.

Install a media center application
There are two major options for a free media center application: xbmc or Plex. What’s unique about these apps as opposed to other video players like VLC, QuickTime Player, or even iTunes is that they have a 10-foot user interface – they can be operated at a distance of about three meters and with a handheld infrared remote. Apple used to include Front Row as a default media center app in OS X but they discontinued it since Lion.
I chose xbmc over Plex for the primary media center application for three reasons:
- xbmc can shutdown the computer. It’s quite a feat since you can control the mac just using the Apple Remove and not fiddle with mice or trackpads. Whereas quitting Plex returns you to the desktop and requires reaching for the trackpad to turn off the mac.
- xbmc can play just about any files even when it couldn’t recognize it as a particular movie or TV show. Both plex and xbmc has the ability to recognize downloaded file names and automatically categorize them into movies or TV shows with their respective genres and all that. But this file name parser isn’t fool-proof and sometimes fails. Plex’s user interface makes it really hard to find these files that falls “between the cracks”.
- Plex on the Mac uses a weird client/server setup but you need to be logged in for the server part to run (Plex’s server on the Mac couldn’t run as a daemon). In my opinion this defeats the whole purpose of having a separate server app in the first place.
Configuring the media user
You’ll need to log in as the media center user (account “Home Theater” as described previously) and configure iTunes and xbmc for use by the account.
Perform these steps as the “media” user:
- Start iTunes by holding the Option (⌥) button and direct it to use the iTunes library that you’ve placed earlier in the
/Users/Shared/Musicfolder. Make sure that everything works well and then quit iTunes. - Afterwards start xbmc and set it up so that it uses iTunes and the media files that is ideally placed in /Users/Shared/Movies. I have two folders inside this which are “TV Shows” for television series and Cinema for feature-length films. You’ll find it useful to differentiate the two since TV shows are generally shorter and good for short bursts of movie watching whereas cinemas are longer and may take a whole afternoon to watch.
- Then quit xbmc and place it in the Dock. You’ll want xbmc to start automatically whenever the Home Theater user logs in, so Ctrl-Click the xmbc icon in the dock, and select “Open at Login” menu under Options.
- Try to play a movie or so to test out the Home Theater account and make sure it works properly.
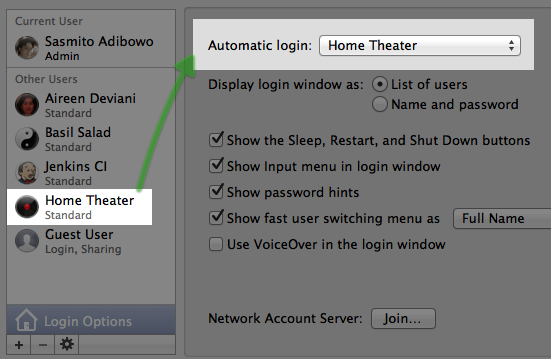
- Open System Preferences and then go to Users & Groups
- Click the Login Options box in the lower-left corner.
- In the Automatic Login box, choose the Home Theater account.

At this point, you might also want to enable Parental Controls or the Simple Finder for the Home Theater account if you have small children that may also use the computer. But for me I don’t really bother. Enjoy your new media center!
